
Home » Posts tagged 'DFD'
Tag Archives: DFD
ER Diagram,DFD’s,CSPEC,PSPEC of a software
Linked post : Structure Analysis
2.9 ER Diagram
Entity – Relationship model (ER model for short) is an abstract way to describe a database. It usually starts with a relational database, which stores data in tables. Some of the data in these tables point to data in other tables – for instance, your entry in the database could point to several entries for each of the phone numbers that are yours. The ER model would say that you are an entity, and each phone number is an entity, and the relationship between you and the phone numbers is ‘has a phone number’. Diagrams created to design these entities and relationships are called entity–relationship diagrams or ER diagrams. Figure 2.1 is the ER diagram of the solution mentioned in the PART A of this paper.
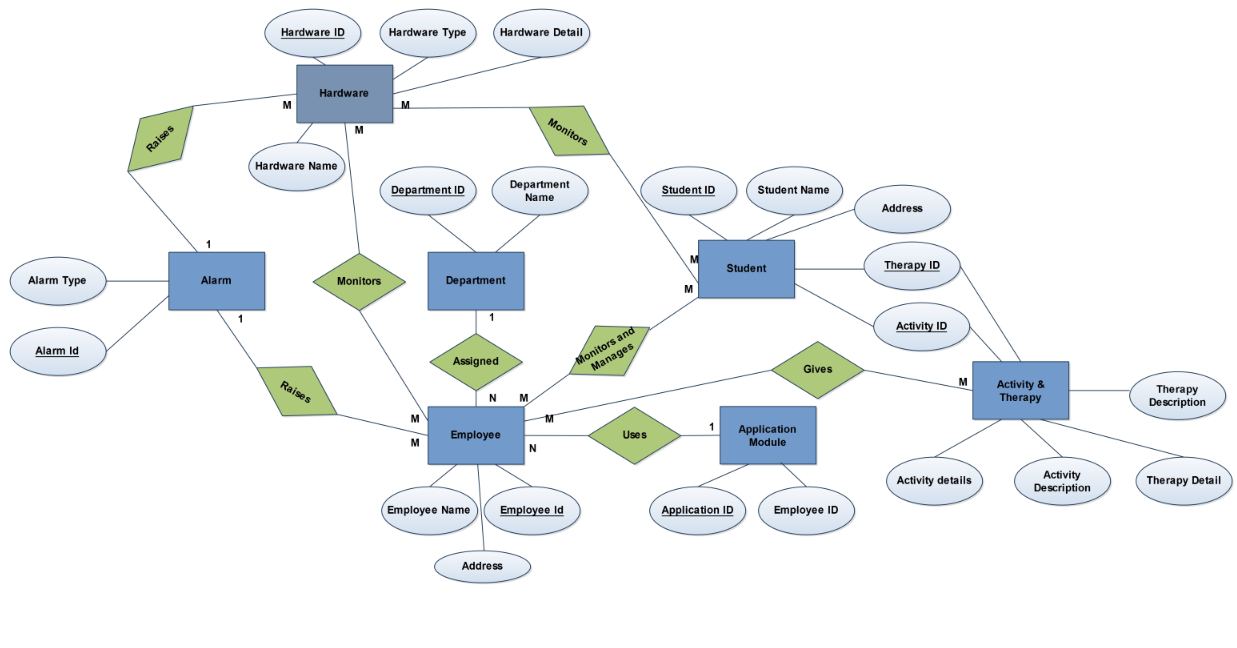
Figure 2.1 E R Diagram
In this diagram the
Entities are:
- Ø Hardware
- Ø Alarm
- Ø Employee
- Ø Department
- Ø Student
- Ø Application Module
- Ø Activity & Therapy
Attributes are:
- Hardware Id
- Hardware Name
- Hardware Type
- Hardware Detail
- Alarm Type
- Alarm Id
- Employee Name
- Employee Id
- Employee Address
- Department Id
- Department name
- Student Id
- Student Name
- Student Address
- Therapy Id
- Activity Id
- Application Id
- Employee Id
- Activity Detail
- Activity Description
- Therapy Detail
- Therapy Description
Relationships are:
- Raises
- Assigned
- Monitors
- Monitors and Manage
- Uses
- Gives
Description
- Hardware: Here the hardware is an entity and it represents the sensors, RFID readers, CCTV’s. These will be used to monitor and track students, employees and their activities.
- Alarm: Alarm is an entity and will be used by the Hardware entity to raise an alarm automatically when it senses some abnormal activity. It can also be used by employees mainly by the security department to raise an alarm manually through the AYS system to notify all in the school.
- Employee: Employee is an entity and in the solution it represents all the staffs who work for the school.
- Department: It is an entity and it represents various functional departments of the school like Admin, Security, Facility, Therapy and Teacher.
- Students: It is an entity and it represents the handicapped students who get admitted to the school for treatment and for various rehabilitation programmes.
- Application Module: It is an entity and it is a part of the AYS application where each module can only be used by the respective members of their department to whom the login credentials have been given by the Server Admin (IT).
- Activity and Therapy: It is an entity and it is a part of the AYS application which will be used by the employee like therapist and teachers to record the various activities and therapies given to the student.
2.10 DFD
Level 0 DFD:

Figure 2.2 Level 0 DFD
Level 1 DFD:
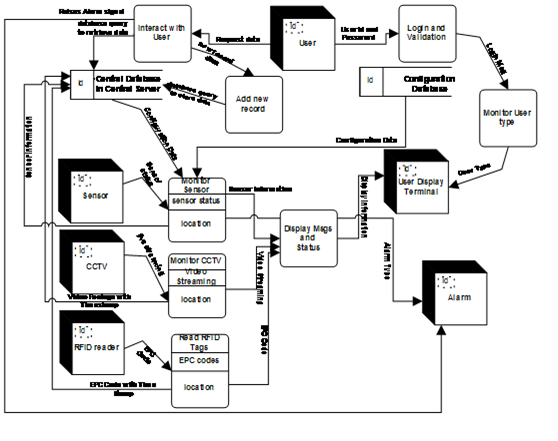
Figure 2.3 Level 1 DFD
Level 2 DFD (Monitor Sensor)
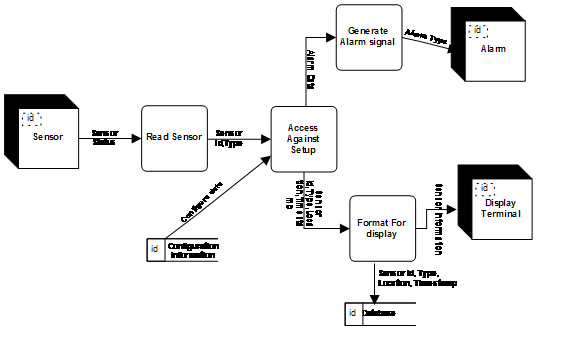
Figure 2.4 Level 2 DFD of Monitor Sensor Process
Level 2 DFD (Monitor CCTV)
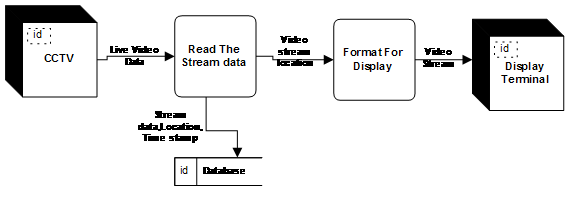
Figure 2.5 Level 2 DFD of Monitor CCTV
Level 2 DFD (Read RFID Tags)
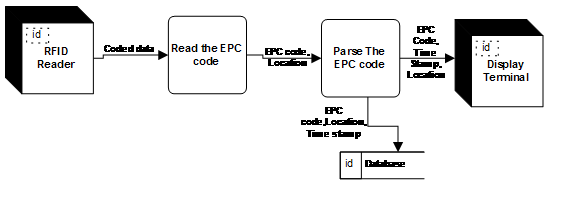
Figure 2.6 Level 2 DFD of Reading RFID Tags
Level 2 DFD (Login and Validation)
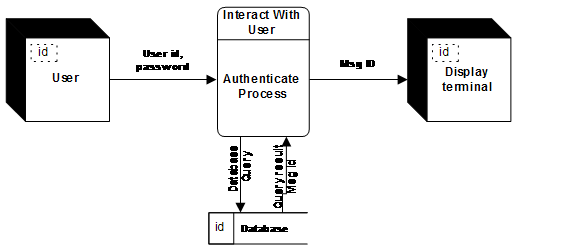
Figure 2.7 Level 2 DFD of Login and Validation Process
Level 2 DFD (Add New record)
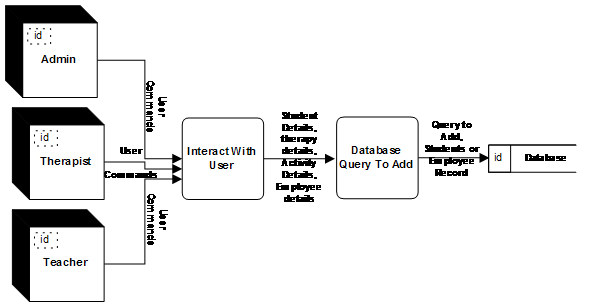
Figure 2.8 Level 2 DFD of Add new records
Level 2 DFD (Retrieve Record)
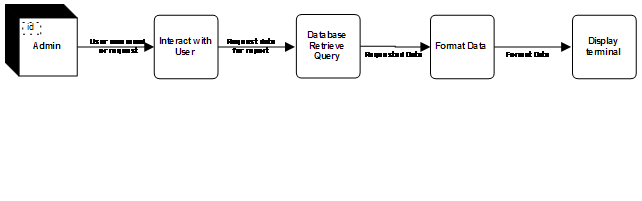
Figure 2.9 Level 2 DFD of retrieving record
2.11 Database Details
2.11. A Employee Table
It is the database table to hold the employee details. Server Admin has select, insert, update and delete rights. Administration department, Facility Management team and Security department has rights to use this table. Rest all department has no permission to access this table.
Employee_Id : Integer ,NOT NULL, (PK)
It is the unique identifier that is assigned to an employee that distinguishes one employee from another.
Employee_name: Char (200)
Name of the employee
Employee_Address: Char (5000)
Address of each employee
Department_Id: Integer, NOT NULL, (FK)
It is the unique identifier of Department table and it says the employee belongs to which department.
Employee_phone: Integer
Phone number of the employee
Employee_email:
It is the email id of the employee
Application_Id: Char(5000)
It is the list of application Id separated by commas and this says the modules of AYS that can be accessed by an employee.
Employee_EPC Code: Integer, NOT NULL, (FK)
It is the field that stores the EPC code of RFID badge of an employee.
2.11. B Department Table
It is the database table to hold the department details. Server Admin has select, insert, update and delete rights. Administration department, Facility Management and Security department has rights to use this table. Rest all department has no rights to access this table.
Department_Id: Char (20), NOT NULL,(PK)
It is the unique identifier that distinguishes one department from another
Department_name: Char(100)
Name of the department
Department_details: Char (5000) : It describes the details of the department.
2.11.C Student Table
It is the database table to hold the students details. Server Admin has select, insert, update and delete rights. Administration, Facility Management and Security department has right to access the table. Rest all department has no rights to access this table.
Student_Id: Integer, NOT NULL,(PK)
It is the unique identifier that distinguishes one student from another student.
Student_name: Char (100)
Name of the student
Student_Address: Char (5000)
Address of each student
Student_phoneNumber: Integer
Phone number of student
Student_GuardianName: Char (200)
Guardian name of the student
Student_GuardianContactAddress: Char (5000)
Address of the guardian
Student_GuardianPhoneNumber: Integer
Phone number of the guardian of the student
Student_Fees: Integer
Fees paid by the student
Student_EPCCode:Integer,NOT NULL,(FK)
It is the field that stores the EPC code of RFID badge of a student.
2.11.D Application Table
It is the database table to hold the application details and this table says which module of AYS application can be accesses by which employee Id. Server Admin has select, insert, update and delete rights. Administration department, Facility Management and Security department has rights to access the table. Rest all department has no rights to access this table.
Application_Id: Char(20),NOT NULL,(PK)
It is the unique identifier that distinguishes one AYS module from another.
Application_details: Char(1000)
It says the details of the application.
2.11.E Therapy Table
It is the database table to hold the therapy details and this table says the therapy details and their respective cost available in the school. Server Admin has select, insert, update and delete rights. Administration department has select rights. Therapist team has select, update and insert rights.
Therapy_id : Char(100),NOT NULL,(PK)
It is the unique identifier that distinguishes one therapy from another.
Therapy_description: Char (1000)
Therapy details
Therapy_Cost: integer
Cost of the particular therapy
2.11.F Activity Table
It is the database table to hold the Activity details and this table says the activity details. Server Admin has select, insert, update and delete rights. Administration department has rights. Teacher’s team has select, update and insert rights.
Activity_Id: Char(100), NOT NULL,(PK)
It is the unique identifier that distinguishes an activity from another.
Activity_details: Char(1000)
This describes the activity descriptions.
2.11.G Student Activity & Therapy Details
It is the database table to hold the details of each student and their duration of each activity and therapies taken in a particular date. Server Admin has select, insert, update and delete rights. Administration department has select rights. Teacher’s team and Therapists Team have select, update, insert and delete rights.
Student_Id: Integer, NOT NULL,(PK)
It is the unique identifier that distinguishes one student from another student.
Activity_Id: Char (100), NOT NULL
It is the unique identifier that distinguishes an activity from another.
Therapy_Id : Char(100),NOT NULL,(PK)
It is the unique identifier that distinguishes one therapy from another.
Activity_duration: Integer
It is the column that stores the duration of the activity done by a student
Therapy_Duration:Integer
It is the column that stores the duration of the therapy given to a student
LogDate: Date, NOT NULL
It stores the date on which each activity/therapy given to a student
Total_Cost: integer
It stores the total cost of activity and therapy taken by a student on that particular date.
2.11. H Hardware Table
It is the database table to hold the details of all the hardware needed by the AYS application and their location of installation. Server Admin has select, insert, update and delete rights. Security and Facility team has select right
Hardware_Id: Integer, NOT NULL,(PK)
It is the unique identifier that distinguishes hardware from another.
Hardware_Type: Char (200)
It is the field that says what is the hardware (CCTV, RFID reader, Alarm, sensor)
Hardware_Location: Char (3000)
It is the field that stores the location of installation of a hardware or Bus number if the same has been installed on a bus.
2.12 Data Dictionary
2.12. A
| Name | Sensor Status |
| Aliases | none |
| Where used/How used | Read sensor(input), Access against setup(output) |
| Description | Sensor status =sensor id+sensor type + location + time stamp |
2.12. B
| Name | Configuration Data |
| Aliases | none |
| Where used/How used | Access Against set up (input) |
| Description | Sensor type= sensor id+ Reaction against+ maximum temperature+ Smoke Level |
2.12. C
| Name | Alarm Data |
| Aliases | none |
| Where used/How used | Generate Alarm Signal (input) |
| Description | Alarm data = alarm type+ alarm sound level |
2.12. D
| Name | Alarm Data |
| Aliases | none |
| Where used/How used | Generate Alarm Signal (input) |
| Description | Alarm data = alarm type+ alarm sound level |
2.12. E
| Name | Video Data |
| Aliases | None |
| Where used/How used | Read The Stream Data(input),Format for diaplay (out put) |
| Description | Video data = video+ timestamp+ location of cctv |
2.12. F
| Name | Coded Data |
| Aliases | None |
| Where used/How used | Read the EPC code (input),parse the epc code(output) |
| Description | Coded Data = EPC Code + RFID Reader ID+ Location code + Time Stamp |
2.12. G
| Name | User id and Password |
| Aliases | Uid, pwd |
| Where used/How used | Authenticate process(input) |
| Description | User id = * Any alpha numeric character *Password = * any alpha numeric character at least 12 character of length and must have at least a upper case character ,a numeric character and a special character * |
2.12. H
| Name | Student details |
| Aliases | None |
| Where used/How used | Interact with user (input), database query to add (output) |
| Description | Student details = student name+ student address+ student id+ students guardian name+ students guardian number+ student fees+ handicapped details |
2.12. I
| Name | Therapy Details |
| Aliases | None |
| Where used/How used | Interact with user (input), database query to add (output) |
| Description | Therapy details = Therapy Id+ Therapy Name+ Therapy Description |
2.12. J
| Name | Activity Details |
| Aliases | None |
| Where used/How used | Interact with user (input), database query to add (output) |
| Description | Activity details = Activity Id+ Activity Name+ Activity Description |
2.12. K
| Name | Employee Details |
| Aliases | None |
| Where used/How used | Interact with user (input), database query to add (output) |
| Description | Employee details = Employee name+ Employee address+ Employee id+ Employee department+ Employee phone+ Employee email |
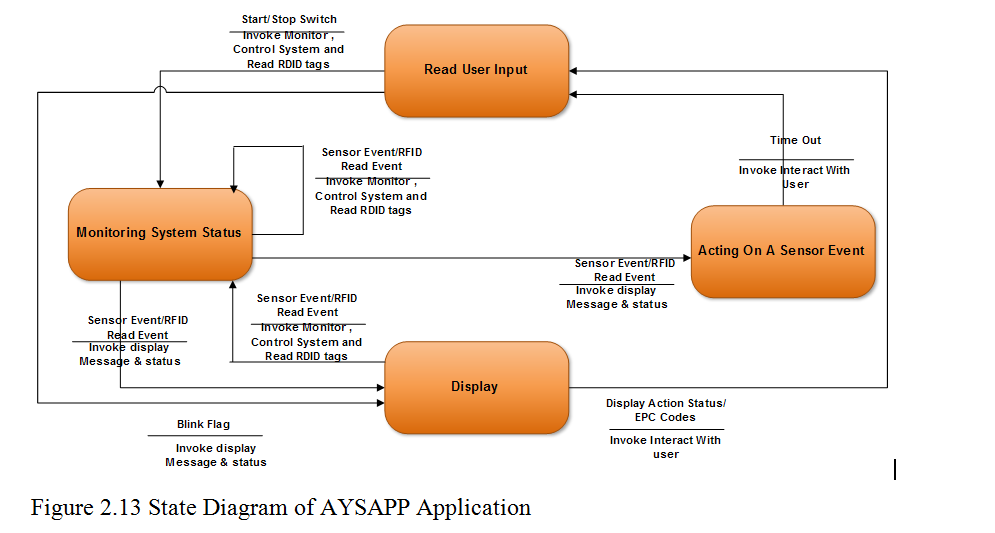
2.12 Control Flow Diagram
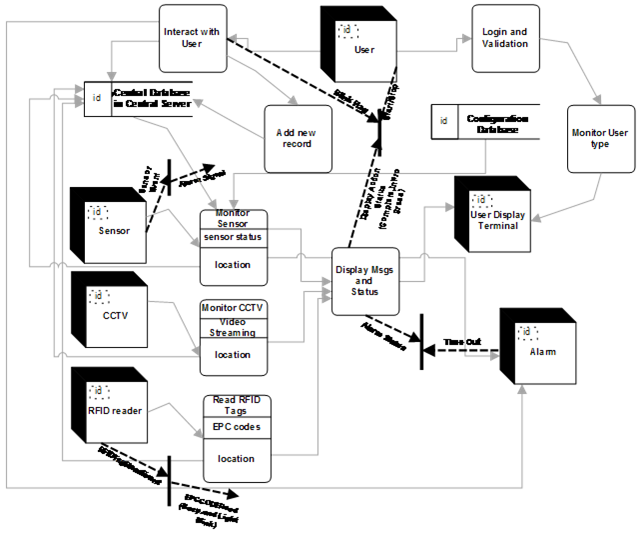
Figure 2.10 Control Flow Diagram of Level 1 of AYS Application
2.14 Control Specs
2.14.1 CSPEC of Sensor
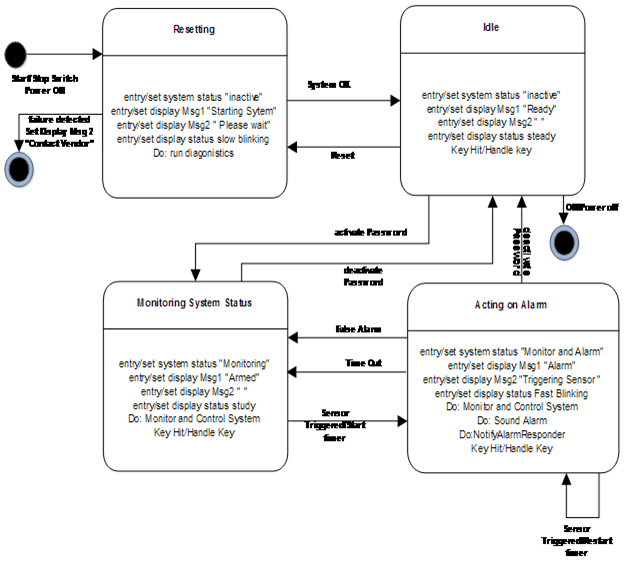
Figure 2.11 State Diagram of sensor
2.14.2 CSPEC of RFID Reader
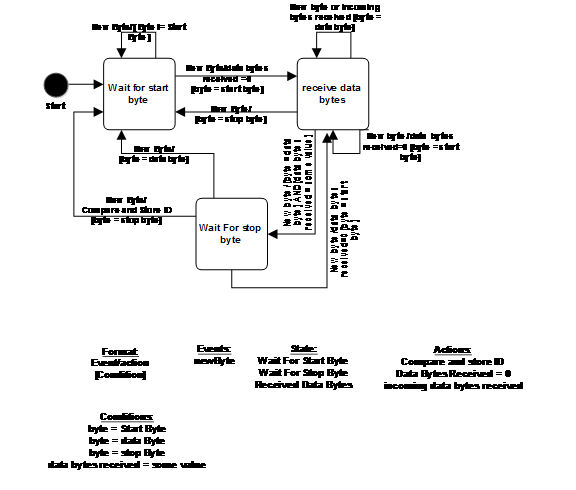
Figure 2.12 State Diagram of RFID readers
2.14.3 CSPEC of AYSAPP Application
2.15 Process Specification
a. PSPEC of Monitor Sensor
The Monitor Sensor process performs the monitoring of inside/outside environment of the school. Whenever it senses any abnormal activity then it signals Alarm to raise alarm and also it alerts the Security team.
- b. PSPEC of Monitor CCTV
The Monitor CCTV tracks all the videos of inside and outside premises of the school and it streams in the Security Module of the AYS application. This process also displays all the videos on screen in 3 x 3 matrix format where the first two rows displays the CCTV footage of the rooms and the last row shows the videos of outside the rooms. This process also provides user to pan and zoom any video. It also saves the videos of all the premises to database with the time stamp.
- c. PSPEC of Read RFID Tags
This process reads the RFID tags as being sent to the application by the reader. The reader gets activated as soon as the RFID tags finds in its range. This process is responsible to parse the EPC code present in the RFID tags. This process also learns the location from where the RFID reader has read the tag.
- d. PSCPEC of Add New Record
This process is used by the administrator team to add new record to the database; let it be an employee new record or a student’s new record. Each record will have a unique ID which can never be NULL. After saving the new record the process sends a notification to the Server Admin team and to security team to generate an EPC code and write it on a RFID tag to create their ID.
- e. PSPEC of Interact with User
This process is used by the AYS application to interact with the user and the server and database through interactive UI of the AYS application.
- f. PSPEC of Login and Validation
Login and validation process is used by the AYS application to authenticate and validate particular user who is trying to login. If the login fails this process also displays error.
- g. PSPEC of Monitor User Type
After login is successful this process basing on the login type the Employee department is tracked and so respective AYS module is loaded on the screen of the user.
h. PSPEC of Display Message and Status
This process takes all the information being sent by hardware like Sensor, CCTV or RFID reader and basing on the hardware this process reads the data sent by the hardware and parses according to the hardware type and then displays the same on the screen of the user.
2.16 Test Cases
TC_AM_01:
Unit to be tested: Admin Module
Assumptions: Students/Employees data is already uploaded in the data base and login credentials given to the user.
Test data:
Login Id = {valid login Id, invalid login Id, empty}
Password = {valid, invalid, empty}
Steps:
- Start the AYS application
- Enter user id
- Enter password
- Click login button
Notes: The user shall login to the AM module of the AYS section if login is successful. Else an error message is shown. If the login was successful then the user shall see the student details page as the starting screen and a message pops of saying the user who had logged in previously and the time stamp. The screen shall also show the current user login name.
TC_AM_02:
Unit to be tested: Admin Module
Assumptions:
Test data:
Student name = {valid name, invalid name, numbers, empty, name with special characters}
Student Address = {valid address1}
Student city = {valid city, invalid city}
Student pin code = {valid pin code, invalid pin code, empty}
Students Email Id = {valid email Id, invalid email Id}
Student roll number = {valid roll number, invalid roll number, roll number with special character}
Student Fees = {valid currency, invalid currency}
Or
Employee name = {valid name, invalid name, numbers, empty, name with special characters}
Employee Address = {valid address1}
Employee city = {valid city, invalid city}
Employee pin code = {valid pin code, invalid pin code, empty}
Employee Email Id = {valid email Id, invalid email Id}
Employee Id = {valid Id, invalid Id, id with special character}
Steps:
- Start the AYS application
- Enter user Id
- Enter password
- Click login button
- Click on Add new record button
Notes: The user shall login to the AM module of the AYS section if login is successful. On click of the Add new record button the application shall show the new record form. After entering all details and clicking on the submit button the information shall be stored in student database or employees data base basing on the selection of the record type as student or employee in the record enrolment form and then the user shall see the added record in their respective table display.
TC_AM_03:
Unit to be tested: Admin Module
Assumptions: Students/Employees data is already uploaded in the data base and login credentials given to the user.
Test data:
Steps:
- Start the AYS application
- Enter user Id
- Enter password
- Click login button
- Click on any student/Employee
- Click on retrieve details
Notes: The user shall login to the AM module of the AYS section if login is successful. On click of the retrieve details button the user shall see all the details of the student/employee.
TC_AM_04:
Unit to be tested: Admin Module
Assumptions: Students/employees data is already uploaded in the data base and login credentials given to the user.
Test data:
Steps:
- Start the AYS application
- Enter user Id
- Enter password
- Click login button
- Click on any student
- Click on print report
Notes: The user shall login to the AM module of the AYS section if login is successful. On click of the print report button the user shall see the print report format screen and the user can query for any report format according to his needs and retrieve the report.
TC_TM_05:
Unit to be tested: Therapist Module
Assumptions: Students data is already uploaded in the data base and login credentials given to the user.
Test data:
Login Id = {valid login Id, invalid login Id, empty}
Password = {valid, invalid, empty}
Steps:
a. Start the AYS application
b. Enter user Id
c. Enter password
d. Click login button
Notes: The user shall login to the TM module of the AYS section if login is successful. Else an error message is shown. If the login was successful then the user shall see the therapy details screen of all the students as the starting screen and a message pops up saying the user who had logged in previously and the time stamp. The screen shall also show the current user login name.
TC_TM_06:
Unit to be tested: Therapist Module
Assumptions
Therapy ID = {valid Id, invalid Id}
Test data:
Steps:
- Start the AYS application
- Enter user Id
- Enter password
- Click login button
- Click on any student in the table
- Click on Therapy button
Notes: The user shall login to the TM module of the AYS section if login is successful. On click of the Therapy button the application shall show the therapy details against each student and the use can choose the therapy given to the student. After entering all Therapy details and clicking on the submit button the student therapy details shall be store to the data base.
TC_TM_07:
Unit to be tested: Therapist Module
Assumptions:
Test data:
Steps:
- Start the AYS application
- Enter user Id
- Enter password
- Click login button
- Click on any student
- Click on retrieve details
Notes: The user shall login to the TM module of the AYS section if login is successful. On click of the retrieve details button the user shall see all the therapy details of the student given on a particular date.
TC_TM_08:
Unit to be tested: Therapist Module
Assumptions:
Test data:
Steps:
- Start the AYS application
- Enter user Id
- Enter password
- Click login button
- Click on print report
Notes: The user shall login to the TM module of the AYS section if login is successful. On click of the print report button the user shall see the print report format screen and the user can query for any report format according to his needs and retrieve the report.
TC_TEM_09:
Unit to be tested: Teachers Module
Assumptions: Students data is already uploaded in the data base and login credentials given to the user.
Test data:
Login Id = {valid login id, invalid login id, empty}
Password = {valid, invalid, empty}
Steps:
a. Start the AYS application
b. Enter user id
c. Enter password
d. Click login button
Notes: The user shall login to the TEM module of the AYS section if login is successful. Else an error message is shown. If the login was successful then the user shall see the activity details screen of all the students as the starting screen and a message pops up saying the user who had logged in previously and the time stamp. The screen shall also show the current user login name.
TC_TEM_10:
Unit to be tested: Teachers Module
Assumptions
Therapy Id = {valid Id, invalid Id}
Test data:
Steps:
- Start the AYS application
- Enter user Id
- Enter password
- Click login button
- Click on any student in the table
- Click on Activity button
Notes: The user shall login to the TEM module of the AYS section if login is successful. On click of the Activity button the application shall show the activity details against each student and the user can choose the activity details given to the student from the activity screen. After entering all Activity details and clicking on the submit button the student activity details shall be stored to the data base.
TC_TEM_11:
Unit to be tested: Teachers Module
Assumptions:
Test data:
Steps:
- Start the AYS application
- Enter user Id
- Enter password
- Click login button
- Click on any student
- Click on retrieve details
Notes: The user shall login to the TEM module of the AYS section if login is successful. On click of the retrieve details button the user shall see all the activity details of the student given on a particular date.
TC_TEM_12:
Unit to be tested: Teachers Module
Assumptions:
Test data:
Steps:
- Start the AYS application
-
- Enter user id
- Enter password
- Click login button
- Click on print report
Notes: The user shall login to the TEM module of the AYS section if login is successful. On click of the print report button the user shall see the print report format screen and the user can query for any report format according to his needs and retrieve the report.
TC_FM_13:
Unit to be tested: Facility Management Module
Assumptions: Students/Employees data is already uploaded in the data base and login credentials given to the user.
Test data:
Login Id = {valid login Id, invalid login Id, empty}
Password = {valid, invalid, empty}
Steps:
a. Start the AYS application
b. Enter user Id
c. Enter password
d. Click login button
Notes: The user shall login to the FM module of the AYS section if login is successful. Else an error message shall be shown. If the login was successful then the user shall see the room details and all bus details screen as the starting screen with each student and bus in a new column in a table format and a message pops up saying the user who had logged in previously and the time stamp. The screen shall also show the EPC codes of students/employees against each room or bus column of those who are in the respective rooms /bus.
TC_FM_14:
Unit to be tested: Facility Management Module
Assumptions:
Test data:
Steps:
- Start the AYS application
- Enter user id
- Enter password
-
- Click login button
- Click on any EPC code that is getting displayed against the room number and bus number.
Notes: The user shall login to the FM module of the AYS section if login is successful. On click of any EPC code the user shall see all the details of the EPC code (student EPC code/employee EPC code)
TC_FM_15:
Unit to be tested: Facility Management Module
Assumptions:
Test data:
Steps:
- Start the AYS application
- Enter user Id
- Enter password
- Click login button
- Click on print report
Notes: The user shall login to the FM module of the AYS section if login is successful. On click of the print report button the user shall see the print report format screen and the user can query for any report format according to his needs and retrieve the report.
TC_SM_16:
Unit to be tested: Security Management Module
Assumptions: Students/Employees data is already uploaded in the data base and login credentials given to the user.
Test data:
Login Id = {valid login id, invalid login id, empty}
Password = {valid, invalid, empty}
Steps:
a. Start the AYS application
b. Enter user id
c. Enter password
d. Click login button
Notes: The user shall login to the SM module of the AYS section if login is successful. Else an error message shall be shown. If the login was successful then the user shall see the video display of all the rooms on the screen as the starting screen with each student in a 3×3 matrix format and thelast column shows the videos of the outside and inside premises except the rooms and a message pops up saying the user who had logged in previously and the time stamp.
TC_SM_17:
Unit to be tested: Security Management Module
Assumptions:
Test data:
Steps:
- Start the AYS application
- Enter user Id
- Enter password
- Click login button
- Click on any matrix on the video and pan or zoom the area.
Notes: The user shall login to the SM module of the AYS section if login is successful. On click of any video and after panning and zooming the video is panned or zoomed according to the gesture performed.
TC_SM_18:
Unit to be tested: Security Management Module
Assumptions:
Test data:
Steps:
- Start the AYS application
- Enter user id
- Enter password
- Click login button
- Click on any video
- Click on print
Notes: The user shall login to the SM module of the AYS section if login is successful. On click of the print button the user shall see the snapshot of the screen on the paper.
TC_SM_19:
Unit to be tested: Security Management Module
Assumptions:
Test data:
Steps:
- Start the AYS application
- Enter user id
- Enter password
- Click login button
- Click on video gallery
- Click on calendar
- Select any date
Notes: The user shall login to the SM module of the AYS section if login is successful. On click of any date in the calendar the SM shall show the user the archive of videos recorded on that particular date.
TC_SM_20:
Unit to be tested: Security Management Module
Assumptions:
Test data:
Steps:
- Start the AYS application
- Enter user id
- Enter password
- Click login button
- Click on Alarm Button
Notes: The user shall login to the SM module of the AYS section if login is successful. On click of alarm button the alarm starts ringing.
TC_SM_21:
Unit to be tested: Security Management Module
Assumptions:
Test data:
Steps:
- Start the AYS application
- Enter user id
- Enter password
- Click login button
- Put some fire near the sensor
- Notes: The user shall login to the SM module of the AYS section if login is successful. On detection of fire or smoke the sensor automatically raises alarm and the AYS application too notifies the security issues to the user.TC_SAM_22: Unit to be tested: Server Admin Module
Assumptions: Students/Employees data is already uploaded in the data base and login credentials given to the user.
Test data:
Login Id = {valid login id, invalid login id, empty}
Password = {valid, invalid, empty}
Steps:
a. Start the AYS application
b. Enter user id
c. Enter password
d. Click login button
Notes: The user shall login to the SAM module of the AYS section if login is successful. Else an error message shall be shown. If the login was successful then the user shall see all modules of the AYS application and SAM user can access any module, an also a pop up message showing the last login user and time stamp and also the current user login.
TC_SAM_23:
Unit to be tested: Server Admin Module
Assumptions:
Test data:
Steps:
a. Start the AYS application
b. Enter user id
c. Enter password
d. Click login button
Notes: The user shall login to the SAM module of the AYS section if login is successful. Else an error message shall be shown. If the login was successful then the user shall see all modules of the AYS application and SAM user can access any module, an also a pop up message showing the last login user and time stamp and also the current user login.
- TC_SAM_24: Unit to be tested: Server Admin ModuleAssumptions:
Test data:
Steps:
a. Start the AYS application
b. Enter user id
c. Enter password
d. Click the write RFID tag
Notes: The user shall login to the SAM module of the AYS section if login is successful. Else an error message shall be shown. If the login was successful and with the write RFID tag button the user shall be shown the fields to enter the EPC code and with the press of the write tag button the application shall write the EPC code to the RFID tag.
TC_SAM_25:
Unit to be tested: Server Admin Module
Assumptions: The RFID tag is written with some EPC code
Test data:
Steps:
a. Start the AYS application
b. Enter user id
c. Enter password
d. Click the Modify tag
Notes: The user shall login to the SAM module of the AYS section if login is successful. Else an error message shall be shown. If the login was successful and with the modify RFID tag button the user shall be shown the fields to modify the EPC code and with the press of the write tag button the application shall write the EPC code to the RFID tag replacing the old one.
